• Steel Soldiers now has a few new forums, read more about it at: New Munitions Forums!

  • Microsoft MSN, Live, Hotmail, Outlook email users may not be receiving emails. We are working to resolve this issue. Please add support@steelsoldiers.com to your trusted contacts.

Florida M1009 interior project has begun!

Geo James

Active member
41
111
33
Location
Florida
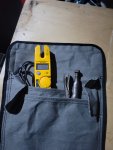
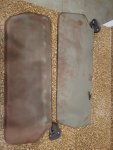
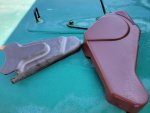
I upholstered the seats 20yrs ago when I got the truck. No window tint in Florida can really test your vinyl. Gonna do it one more time but this time I'm going to try to get as close to factory original as possible. Went to Brytech in Jacksonville and found something pretty close. Kinda looks like a dark reddish plum. The camera keeps pulling out alot of red in the pictures. I'm going to post before and after pics and progression updates.

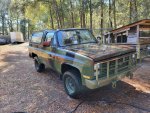
I copied the original seat design the first time so I guess you would say this time is a copy of a copy. It's been sitting for three years, but I'm going to make it my daily driver. I just love that truck, and she deserves some TLC. I always wanted to restore it, but paint and bodywork have always been my roadblock. After reading about the Behr paint and no weld panels it lit a fire under me. Feel free to chime in with suggestions. Anyways here is the start.
 

Attachments

Geo James

Active member
41
111
33
Location
Florida
Thank you! I'll get my Behr paint experience on the interior and with the new covers and refurbished interior parts. I think it's really going to pop. I have some leftover olive drab whiteduck heavy canvas from my jeep cover. I'll use it to remake the canvas bag behind the Jerry can mount.
 

Geo James

Active member
41
111
33
Location
Florida
Completed the passenger seat. Not perfect but the second one is always better. It's been 17yrs and one stroke since I've done auto seats. Remade the canvas bag behind the Jerry can mount. Still need to stencil "US" on the bag. I'll start the sun visors tomorrow. If somebody can post a picture of the original visor decals I'd appreciate it.
 

Attachments

Geo James

Active member
41
111
33
Location
Florida
I've ordered the visor decals from Hillbilly wizard, can someone tell me the location of the original decals? Centered on the roof side or windshield side of each visor or both on drivers visor? It's been 20 years and I suffer from CRS!
Can't Remember S#!^.

Thank you,
 

Geo James

Active member
41
111
33
Location
Florida
Got the decals from Hillbilly Wizard installed. TM shows them off to the left a bit, not sure why. I'm a bit OCD so I centered them on the visor. Deciding what to do with the cracked dash cap. It had the gray replacement cap when I got it from GL but has since cracked in the last 20 years.

Thinking maybe do a chipboard cover over the entire topside then cover with thin padding and same vinyl as seats. May have to put a French seam where it folds around to the gauge cluster. Any ideas would be welcome.

20251209_183432.jpg
 

Geo James

Active member
41
111
33
Location
Florida
Got the backseat completed. Most of drivers seat is sewn up, just a few more pieces and the upholstery will be done. Got new seatbelt webbing. It was supposed to be burgundy, not soo much. Going to change to black webbing. Although the brighter belts would guarantee no seatbelt ticket.

Funny thing, the only seatbelt ticket I've gotten was in the 1009 15yrs ago. Couldn't see the belt and I got the ticket. It was a motorcycle cop. He can straddle an engine and fly down the road, im surrounded by good steel and I have to have a strap around me. Go figure. I digress.

I changed the cardboard bottom to black textured ABS plastic. Should be more durable when the seat is folded and cargo is loaded or shifting. Just a heads up on the flip up seat. The latch in the back needs to completely close so the flat of the latch is under the rods in the floor.

When I took mine out, it appeared fully latched but the floor rods were just kinda pinched by the latch making a very effective ejection seat in case of a crash. Seatbelts are tied to the frame so they would have been of no use. Passengers would have flip and folded. Not good! Rusty latch blasted and lubed and working like new now.

20251228_132209.jpg20251228_132229.jpg20251228_160943.jpg
 

Geo James

Active member
41
111
33
Location
Florida
Went ahead and bit the bullet and order the new printed circuit for the instrument cluster from LMC truck. (38-8036) Made in Taiwan. Got it delivered today.

Comparing it to Warthog's picture it appears to be a perfect match. Thank you Warthog for de-mystifying the circuitry. I'll update when I get it installed. Interior update, last seat completed and floor painted. Mountain Olive in Behr Ultra. Cheap dash cover from Amazon delivered. ($54)

The burgundy is a perfect color match to the seat vinyl. Going to take some creative heating and a much better adhesive to make it work. I figured for the price it will be a good experiment. Update later on that as well.

20260112_184048.jpgScreenshot_20260112_183552_Chrome.jpg20260109_173318.jpg20260110_160340.jpg20260110_162122.jpg
 

Geo James

Active member
41
111
33
Location
Florida
Thank you deank! Here is another heads up for M1009 drivers. While remaking my seatbelts, I found an issue. The white latch buttons on the side door jams are suppose to deactivate the latching mechanism of the shoulder belt when the door is opened.

This serves two purposes. 1 to retract the seatbelt so rear passengers can enter and exit the vehicle unimpeded. 2 so you don't go down the road dragging you seatbelt if you forget to put it on. The issue I believe I found is that this latching mechanism is made from a soft nylon material (both good and bad) more on that in a moment. The soft nature of the latch button allows it to slide off the flat of the door and over time take a noticeable set. It then wears at that angle.
20260113_183249.jpg20260113_183316.jpg

This then allows the latching mechanism to stay unlocked and in the retracted position, not sure if this locks out the inertia dongal or not. Should know more on that when I dig in deeper. From what I understand this is only used on the Blazer body style. No suburban or trucks have them from what I've read and only there to access the rear seating.

This part is not available to purchase, I guess they don't want people digging into the seatbelt mechanism. On my 1009 only the drivers door was in complete failure mode. Passengers door was rough but functional. My work around was to drill out some 3/8 aluminum rod to the proper depth using a 5/16 bit to allow for the 1/4" diameter spring. I then cut it to the proper length. I used the old latch trigger as a sleeve over the rod I made.

20260113_181000.jpg20260113_183413.jpg20260113_181122.jpg
20260113_181051.jpg20260113_181150.jpg

With some creative drilling 3/8 bit and sandpaper rolled and chucked up in the drill the soft nylon hollow center can be enlarged and used as a tight fitting sleeve over the aluminum rod.

I'm really happy with the finished product and have complete confidence it will perform better than oem without deformation. Some finish sanding on the outside surface of the sleeve has it running smoothly through the housing tube.

Any comments or insights would be welcome as this is a lifesaving device.

Thank you,
James
 
Top
AdBlock Detected

We get it, advertisements are annoying!

Sure, ad-blocking software does a great job at blocking ads, but it also blocks useful features of our website like our supporting vendors. Their ads help keep Steel Soldiers going. Please consider disabling your ad blockers for the site. Thanks!

I've Disabled AdBlock
No Thanks